:River Colors Journal: July 2016 - Knitting Tips Blog
River Colors Studio Yarns CONTACT US SHOP ONLINE
River Colors Journal

Friday, July 29, 2016
 

Intro to Yarn Bombing 101
Wait, what is a yarn bomber?   We at the studio want to introduce you to the concept of yarn bombing.   Many of you have already been introduced to the concept and this is old news to you.  Those of you new to the concept may be chuckling all day.....you may never look at a fence the same way. Instead of seeing something that is meant to contain or prevent access....you will see something that your hook or needles wants to brighten up.
According to  Wikepedia  the definition of yarn bombing is: a type of graffiti or street art that employs colourful displays of knitted or crocheted yarn or fibre rather than paint or chalk....;Wikipedia has  a number of references that state that "Yarn bombing was initially almost exclusively about reclaiming and personalizing sterile or cold public places. It has since developed with groups graffiti knitting and crocheting worldwide, each with their own agendas and public graffiti knitting projects being run.  

Below are random images of yarn bombing through out the world, however Hana found a bomber with a purpose and she scored an interview!

Read Hana's interview with Stephen Duneier on Monday.
.


Friday, July 22, 2016
 

On Color Pops and cleverness

Color makes us feel alive.

Where we place it makes us feel clever.
 So I have to say one of the things we discuss the most at the studio is color.  I think every day we have someone hold up two different colors of  yarn and ask "which color do you think looks the best on me"?  The other discussion we are often included in is "I want to change up my colors and get outside my comfort zone".   I propose to you that there are lots of ways to work with the colors that you want to without having to worry about either of those issues.   We call it the yarn pop!  With a little cleverness you can include the colors you want to work with...those outside of your comfort zone or what looks good on you. How about using that neon that you love in a not so obvious place?  I am using fashion garments to demonstrate the concepts so that your creativity gets sparked a little. Yes you are right, usually we are not going to line a poncho with the neon but we might knit or crochet a poncho and then punch it up with a stripe of neon at the edge or place that neon as a patch pocket on a sweater you have knitted or crocheted. Select a shawl pattern that can  end with the color that you are dying to use.  When you are no longer in love with that color or the fashion trend is outdated you can rip back to your comfort zone colors and replace the outdated colors with new ones.   That is the beauty of yarn.  Yarn is recyclable and reusable.


                  bunmomamy's pasOsolo on Ravelry


Colors leads you to places you would not normally go to!


How about this woman?  I think she usually likes to wear neutral colors.   This amazing fashionable dress she has would look totally different if it were in the orange pop that she has on her hat.  Perhaps in the orange the clean sharp lines and drape would be totally lost.  She added color by inviting you to see that pop of orange first and then you look at the rest of the garment styling.  Perhaps you want to use colors that you are comfortable with but there are those other colors that keep speaking to you.  Look for a  pattern that will enable you to use them.   Take a look at Stephen West's Reis.  Look at the different photos of this very traditional sweater and take note of color pops.  It is amazing how one pattern can look so different based on color selection.  

komepanda's Reis on Ravelry.


Go ahead, give it a try.  Play with the colors you have been wanting to.  It is the perfect opportunity for playing with the crayon box of colors that we have thanks to Hedgehog Fibres and Madelinetosh


Erika


Thursday, July 14, 2016
 

Breaking free from patterns
One of my favorite things about crochet is how easy it is to improvise.  Once you know a few techniques - single and double crochet, how to make even rows, how to work in rounds, maybe some increases and decreases - you have all the skills you need to modify existing patterns and design your own projects.

Because you have only one "live" stitch on the hook, it's very easy to see exactly what's going on in the fabric you're making. No need to find a pattern for a simple pullover; just grab an existing sweater from your wardrobe and crochet pieces that are the same size as the ones in your current garment.   You can easily measure your crocheted piece up against the existing garment to make sure you're on the right track with shaping, drape, and overall size.  Try it on a kid's garment first - the investment in time and yarn isn't so great - and soon you'll be off to the races.

Sweaters aren't the only thing you can create as you go.  Amigurumi (a fancy Japanese word for "little stuffed toys") is a great way to play around and invent new things.  The basic body shape is usually round or oval, and things like arms, ears, and clothes can all be added or changed.  Check out these tutorials to start from scratch, or find a basic pattern and embellish it as you get more familiar with the craft.
Img_0505_small2
http://www.ravelry.com/patterns/library/easter-chicky-amigurumi
Cute little chicks aren't the only thing you can crochet off the cuff.  If you've ever held a crochet hook in your hand, someone has probably shared pictures of the Crocheted Coral Reef  project with you.
http://crochetcoralreef.org/Content/gallery/IFF_2-3.jpg
This art installation is an example of something called "hyperbolic crochet," The technique was developed in 1997 by Dr. Daina Taimina, a mathematician at Cornell, as a way to model a concept known as "hyperbolic space."  The resulting objects don't just look cool - they mimic the actual geometry that nature uses in things like kelps, corals, sponges, sea slugs, and nudibranchs.  A quick search of Ravelry for the term "hyperbolic" returns plenty of options for getting started with the basic shapes.  You'll still be following a loose "pattern," but the results are a lot more organic than your typical granny square.

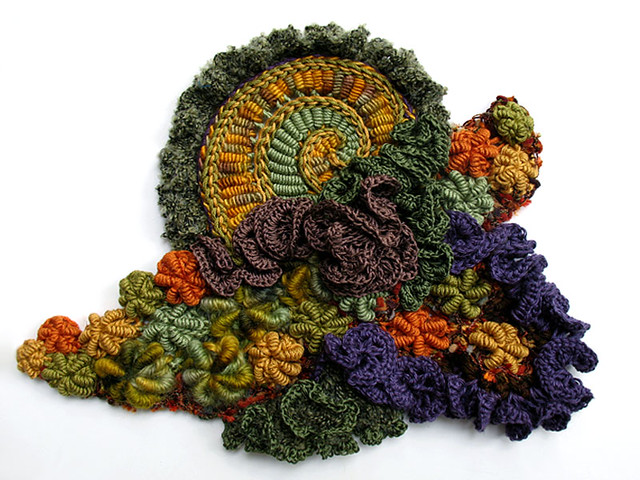
And if that's still not wild enough for you ... how about Freeform Crochet?  I'm not all that familiar with this technique (yet), but the basic idea is that you mix and match colors, patterns, and stitches as much or as little as you want.  Pieces don't have to be worked in rows or rounds unless you want them to be - otherwise, you can make the stitches wherever your heart desires!  Frequently, individual pieces (called "scrumbles") are joined together to make a larger garment, blanket, bag, or other project.
http://farm3.static.flickr.com/2207/2080472811_3f815b6556_z.jpg
Here is a great round-up of tutorials to get you started.

Whichever technique you choose, you shouldn't be afraid to grab a hook and try something new.  After all, summer is a time to PLAY, right?

- Gretchen

Labels: , , , , , ,


Tuesday, July 05, 2016
 

A Little Shirt for a Little Lady
Hi everyone, I am Hana.
I'm a lifelong crafter. I've been knitting and crocheting since I was eight years old.    Over the years of exploring the fiber arts I have become increasingly passionate about it

Making gifts for family and friends has taken up the majority of my crafting time, but now that I'm a mom, I'm finding myself poring over patterns for little girl clothes and accessories. There are a million and one cute things to make for a little girl, so how do you choose? I had some Juniper Moon Farm Zooey left over from knitting a shirt from my mom and thought it would be wonderful for grandma and granddaughter to have matching shirts.   Because Zooey is a DK weight yarn  I knew I needed a pattern that called for that gauge. In my personal stash I had a bit of Berroco Linsey that I wanted to use for a nice color pop.  The Linsey was also going to be my back up in case I ran out of the main yarn. Excited to cast on, I headed over to Ravelry to find a pattern that fit my requirements.

My search ended when I found the All in One Sleeveless Baby Top by Marianna Mel. Knit in a DK weight yarn on size US 6 needles, there are options for sizes from six months all the way up to twelve months. It looks great in any color, so I knew I had found my pattern.

Photo credit: Marianna Mel
I loved that not only was it one piece, I had the right amount of buttons in the right size. The only thing I didn't particularly care for was how it was open all the way down. I had pictured more of an actual shirt, but since I was excited to make something I went ahead and cast on. It's a quick and fun knit, great for hanging out on the couch with your baby. I found myself working on the last button hole round before I knew it, while I kept admiring how cute it was, I still wasn't wild about leaving it open all the way down. What were my options? I didn't have enough buttons to continue that way, so that idea was out. What was my other option? The only other choice I could see was to join it in the round and go from there.

I took a good look at the construction of the top and what would happen if I joined it as it was. When I pulled it together it seemed a tiny bit bunched, so after joining I did a make one increase to the left. Increasing by one stitch was enough to allow it to lay correctly without puckering. From there it was a simple matter of knitting till I was happy with how long it was. Five easy rows of 1x1 ribbing completed the shirt. All in all it was a very simple modification yet, that one little change altered the entire look of the garment.


As you can see, little miss Rose is pleased with her new shirt. I am happy with the finished product and with the confidence I've gained. Now I feel like I can tackle more complex modifications without fear.

Thanks for joining us, now go make something!

Hana & Rose

Labels: , , , , , ,