
Thursday, July 14, 2016
Breaking free from patterns
One of my favorite things about crochet is how easy it is to improvise. Once you know a few techniques - single and double crochet, how to make even rows, how to work in rounds, maybe some increases and decreases - you have all the skills you need to modify existing patterns and design your own projects.
Because you have only one "live" stitch on the hook, it's very easy to see exactly what's going on in the fabric you're making. No need to find a pattern for a simple pullover; just grab an existing sweater from your wardrobe and crochet pieces that are the same size as the ones in your current garment. You can easily measure your crocheted piece up against the existing garment to make sure you're on the right track with shaping, drape, and overall size. Try it on a kid's garment first - the investment in time and yarn isn't so great - and soon you'll be off to the races.
Sweaters aren't the only thing you can create as you go. Amigurumi (a fancy Japanese word for "little stuffed toys") is a great way to play around and invent new things. The basic body shape is usually round or oval, and things like arms, ears, and clothes can all be added or changed. Check out these tutorials to start from scratch, or find a basic pattern and embellish it as you get more familiar with the craft.
This art installation is an example of something called "hyperbolic crochet," The technique was developed in 1997 by Dr. Daina Taimina, a mathematician at Cornell, as a way to model a concept known as "hyperbolic space." The resulting objects don't just look cool - they mimic the actual geometry that nature uses in things like kelps, corals, sponges, sea slugs, and nudibranchs. A quick search of Ravelry for the term "hyperbolic" returns plenty of options for getting started with the basic shapes. You'll still be following a loose "pattern," but the results are a lot more organic than your typical granny square.
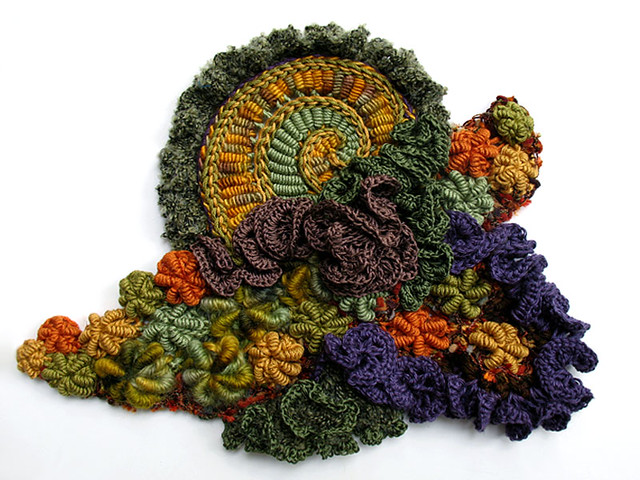
And if that's still not wild enough for you ... how about Freeform Crochet? I'm not all that familiar with this technique (yet), but the basic idea is that you mix and match colors, patterns, and stitches as much or as little as you want. Pieces don't have to be worked in rows or rounds unless you want them to be - otherwise, you can make the stitches wherever your heart desires! Frequently, individual pieces (called "scrumbles") are joined together to make a larger garment, blanket, bag, or other project.
Here is a great round-up of tutorials to get you started.
Whichever technique you choose, you shouldn't be afraid to grab a hook and try something new. After all, summer is a time to PLAY, right?
- Gretchen
Because you have only one "live" stitch on the hook, it's very easy to see exactly what's going on in the fabric you're making. No need to find a pattern for a simple pullover; just grab an existing sweater from your wardrobe and crochet pieces that are the same size as the ones in your current garment. You can easily measure your crocheted piece up against the existing garment to make sure you're on the right track with shaping, drape, and overall size. Try it on a kid's garment first - the investment in time and yarn isn't so great - and soon you'll be off to the races.
Sweaters aren't the only thing you can create as you go. Amigurumi (a fancy Japanese word for "little stuffed toys") is a great way to play around and invent new things. The basic body shape is usually round or oval, and things like arms, ears, and clothes can all be added or changed. Check out these tutorials to start from scratch, or find a basic pattern and embellish it as you get more familiar with the craft.
 |
| http://www.ravelry.com/patterns/library/easter-chicky-amigurumi |
Cute little chicks aren't the only thing you can crochet off the cuff. If you've ever held a crochet hook in your hand, someone has probably shared pictures of the Crocheted Coral Reef project with you.
 |
| http://crochetcoralreef.org/Content/gallery/IFF_2-3.jpg |
And if that's still not wild enough for you ... how about Freeform Crochet? I'm not all that familiar with this technique (yet), but the basic idea is that you mix and match colors, patterns, and stitches as much or as little as you want. Pieces don't have to be worked in rows or rounds unless you want them to be - otherwise, you can make the stitches wherever your heart desires! Frequently, individual pieces (called "scrumbles") are joined together to make a larger garment, blanket, bag, or other project.
 |
| http://farm3.static.flickr.com/2207/2080472811_3f815b6556_z.jpg |
Whichever technique you choose, you shouldn't be afraid to grab a hook and try something new. After all, summer is a time to PLAY, right?
- Gretchen
Labels: 2016, amigurumi, crochet, freeform crochet, hyperbolic crochet, stashbuster, techniques


